import folium
from folium import plugins
import pandas as pd
import numpy as np
Dataset
Let's start by loading shape data:
url = "https://raw.githubusercontent.com/holtzy/The-Python-Graph-Gallery/master/static/data/earthquakes.csv"
df = pd.read_csv(url)
df = df[df['Depth (km)'] >= 0.01]  # depth of at least 10 meters
df.sort_values(by='Depth (km)', ascending=False, inplace=True)
df.head()| Date | Time (utc) | Region | Magnitude | Depth (km) | Latitude | Longitude | Mode | Map | year | |
|---|---|---|---|---|---|---|---|---|---|---|
| 7961 | 20/02/2019 | 06:50:47 | Banda Sea | 5.0 | 2026 | -6.89 | 129.15 | A | - | 2019.0 |
| 6813 | 07/07/2019 | 07:50:53 | Eastern New Guinea Reg, P.N.G. | 5.4 | 1010 | -5.96 | 147.90 | A | - | 2019.0 |
| 8293 | 17/01/2019 | 14:01:50 | Fiji Islands | 4.7 | 689 | -18.65 | 179.44 | A | - | 2019.0 |
| 11258 | 03/01/2018 | 06:42:58 | Fiji Islands Region | 5.5 | 677 | -19.93 | -178.89 | A | - | 2018.0 |
| 9530 | 06/09/2018 | 18:22:24 | Fiji Islands Region | 5.8 | 672 | -18.88 | 179.30 | A | - | 2018.0 |
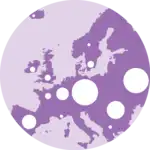
Custom bubble style
The main steps to create a bubble map with folium are:
- initiate the map with
folium.Map() - iterate over each rows to add each individual point with
folium.CircleMarker()
In order to make each point better looking, in the CircleMarker(), we:
- change
radiusto the value inrow['Depth (km)'] - change the
colordepending on the magnitude with:color = '#0a9396' if row['Magnitude'] < 4 else '#ee9b00' if row['Magnitude'] < 6 else '#ae2012' - change the opacity with
fill_opacity - change border width with
weight
# Initialize map
m = folium.Map(
    location=[0, 0],  # center around Africa
    zoom_start=2,  # dezoom
    tiles='cartodb positron'  # background style
)

# Add all the individual earthquakes to the map
for idx, row in df.iterrows():
    color = '#0a9396' if row['Magnitude'] < 4 else '#ee9b00' if row['Magnitude'] < 6 else '#ae2012'
    folium.CircleMarker(
        location=[row['Latitude'], row['Longitude']],
        radius=np.log(row['Depth (km)']) * 2,
        color=color,
        fill=True,
        fill_color=color,
        fill_opacity=0.5,
        weight=1
    ).add_to(m)

m.save('../../static/interactiveCharts/593-customize-bubble-map-with-folium-1.html')%%html
<iframe
src="../../interactiveCharts/593-customize-bubble-map-with-folium-1.html"
width="790"
height="600"
title="Folium map"
style="border: none"
>
</iframe>
Tooltip
An interactive map without a tooltip wouldn't be very effective!
Luckily, with the tooltip argument, customizing it is straightforward, and we can even incorporate some HTML into it.
For instance, we can display the Location, Magnitude, Depth, and Date, wrap them in <b> tags for boldness, and set them as level 5 headings (<h5>).
# Initialize map
m = folium.Map(
    location=[0, 0],
    zoom_start=2,
    tiles='cartodb positron'
)

# Add all the individual earthquakes to the map
for idx, row in df.iterrows():
    tooltip_text = f"""
   <h5><b>Location:</b> {row['Region']}</h5>
   <h5><b>Magnitude:</b> {row['Magnitude']}</h5>
   <h5><b>Depth:</b> {row['Depth (km)']} km</h5>
   <h5><b>Date:</b> {row['Date']}</h5>
   """
    color = '#0a9396' if row['Magnitude'] < 4 else '#ee9b00' if row['Magnitude'] < 6 else '#ae2012'
    folium.CircleMarker(
        location=[row['Latitude'], row['Longitude']],
        radius=np.log(row['Depth (km)']) * 2,
        color=color,
        fill=True,
        fill_color=color,
        fill_opacity=0.5,
        weight=1,
        tooltip=folium.Tooltip(tooltip_text, sticky=True)
    ).add_to(m)

m.save('../../static/interactiveCharts/593-customize-bubble-map-with-folium-2.html')%%html
<iframe
src="../../interactiveCharts/593-customize-bubble-map-with-folium-2.html"
width="790"
height="600"
title="Folium map"
style="border: none"
>
</iframe>Automatically cluster points
folium comes with a set of plugins to add new features super easily!
For example here we use the MarkerCluster() plugin to automatically cluster the marker into groups when zooming-out.
And in order for this to work: we add the markers to the map with .add_to(marker_cluster) instead of .add_to(m)
from folium import plugins

# Initialize map
m = folium.Map(
    location=[0, 0],
    zoom_start=2,
    tiles='cartodb positron'
)

# Add earthquake data with clustering
marker_cluster = plugins.MarkerCluster().add_to(m)

# Add all the individual earthquakes to the map
for idx, row in df.iterrows():
    tooltip_text = f"""
   <h5><b>Location:</b> {row['Region']}</h5>
   <h5><b>Magnitude:</b> {row['Magnitude']}</h5>
   <h5><b>Depth:</b> {row['Depth (km)']} km</h5>
   <h5><b>Date:</b> {row['Date']}</h5>
   """
    color = '#0a9396' if row['Magnitude'] < 4 else '#ee9b00' if row['Magnitude'] < 6 else '#ae2012'
    folium.CircleMarker(
        location=[row['Latitude'], row['Longitude']],
        radius=np.log(row['Depth (km)']) * 2,
        color=color,
        fill=True,
        fill_color=color,
        fill_opacity=0.7,
        weight=0.4,
        tooltip=folium.Tooltip(tooltip_text, sticky=True)
    ).add_to(marker_cluster)

m.save('../../static/interactiveCharts/593-customize-bubble-map-with-folium-3.html')%%html
<iframe
src="../../interactiveCharts/593-customize-bubble-map-with-folium-3.html"
width="790"
height="600"
title="Folium map"
style="border: none"
>
</iframe>Going further
You might be interested in:
- learn more about how to create bubble maps
- understand the basics of folium
- this great static bubble map